SWAG
The goal of this guide is to give you ideas on what can be accomplished with the LinuxServer SWAG docker image and to get you started. We will explain some of the basic concepts and limitations, and then we'll provide you with common examples. If you have further questions, you can ask on our forum or join our Discord for conversations.
Introduction
What are SSL certs?
SSL certs allow users of a service to communicate via encrypted data transmitted up and down. Third party trusted certs also allow users to make sure that the remote service they are connecting to is really who they say they are and not someone else in the middle. When we run a web server for reasons like hosting websites or reverse proxying services on our own domain, we need to set it up with third party trusted ssl certs so client browsers trust it and communicate with it securely. When you connect to a website with a trusted cert, most browsers show a padlock icon next to the address bar to indicate that. Without a trusted cert (ie. with self signed cert) most browsers show warning pages or may block access to the website as the website identity cannot be confirmed via a trusted third party.
What is Let's Encrypt (and/or ZeroSSL)?
In the past, the common way to get a trusted ssl cert was to contact one of the providers, send them the relevant info to prove ownership of a domain and pay for the service. Nowadays, with Let's Encrypt and ZeroSSL, one can get free certs via automated means.
The SWAG docker image, published and maintained by LinuxServer.io, makes setting up a full-fledged web server with auto generated and renewed ssl certs very easy. It is essentially an nginx webserver with php7, fail2ban (intrusion prevention) and Let's Encrypt cert validation built-in. It is just MySQL short of a LEMP stack and therefore is best paired with our MariaDB docker image.
Creating a SWAG container
Most of the initial settings for getting a webserver with ssl certs up are done through the docker run/create or compose yaml parameters. Here's a list of all the settings available including the optional ones. It is safe to remove unnecessary parameters for different scenarios.
docker cli
docker create \
  --name=swag \
  --cap-add=NET_ADMIN \
  -e PUID=1000 \
  -e PGID=1000 \
  -e TZ=Europe/London \
  -e URL=yourdomain.url \
  -e SUBDOMAINS=www, \
  -e VALIDATION=http \
  -e CERTPROVIDER= `#optional` \
  -e DNSPLUGIN=cloudflare `#optional` \
  -e EMAIL=<e-mail> `#optional` \
  -e ONLY_SUBDOMAINS=false `#optional` \
  -e EXTRA_DOMAINS=<extradomains> `#optional` \
  -e STAGING=false `#optional` \
  -p 443:443 \
  -p 80:80 `#optional` \
  -v </path/to/appdata/config>:/config \
  --restart unless-stopped \
  lscr.io/linuxserver/swag
docker-compose
Compatible with docker-compose v2 schemas.
---
version: "2.1"
services:
  swag:
    image: lscr.io/linuxserver/swag
    container_name: swag
    cap_add:
      - NET_ADMIN
    environment:
      - PUID=1000
      - PGID=1000
      - TZ=Europe/London
      - URL=yourdomain.url
      - SUBDOMAINS=www,
      - VALIDATION=http
      - CERTPROVIDER= #optional
      - DNSPLUGIN=cloudflare #optional
      - EMAIL=<e-mail> #optional
      - ONLY_SUBDOMAINS=false #optional
      - EXTRA_DOMAINS=<extradomains> #optional
      - STAGING=false #optional
    volumes:
      - </path/to/appdata/config>:/config
    ports:
      - 443:443
      - 80:80 #optional
    restart: unless-stopped
Authorization method
Our image currently supports two different methods to validate domain ownership:
- http:
- Let's Encrypt (acme) server connects to domain on port 80
- dns:
- Let's Encrypt (acme) server connects to dns provider
- Api credentials and settings entered into
inifiles under/config/dns-conf/ - Supports wildcard certs
The validation is performed when the container is started for the first time. Nginx won't be up until ssl certs are successfully generated.
The certs are valid for 90 days. The container will check the cert expiration status every night and if they are to expire within 30 days, it will attempt to auto-renew. If your certs are about to expire in less than 30 days, check the logs under /config/log/letsencrypt to see why the auto-renewals failed.
Cert Provider (Let's Encrypt vs ZeroSSL)
As of January 2021, SWAG supports getting certs validated by either Let's Encrypt or ZeroSSL. Both services use the ACME protocol as the underlying method to validate ownership. Our Certbot client in the SWAG image is ACME compliant and therefore supports both services.
Although very similar, ZeroSSL does (at the time of writing) have a couple of advantages over Let's Encrypt:
- ZeroSSL provides unlimited certs via ACME and has no rate limits or throttling (it's quite common for new users to get throttled by Let's Encrypt due to multiple unsuccessful attempts to validate)
- ZeroSSL provides a web interface that allows users to list and manage the certs they have received
SWAG currently defaults to Let's Encrypt as the cert provider so as not to break existing installs, however users can override that behavior by setting the environment variable CERTPROVIDER=zerossl to retrieve a cert from ZeroSSL instead. The only gotcha is that ZeroSSL requires the EMAIL env var to be set so the certs can be tied to a ZeroSSL account for management over their web interface.
Port forwards
Port 443 mapping is required for access through https://domain.com. However, you don't necessarily need to have it listen on port 443 on the host server. All that is needed is to have port 443 on the router (wan) somehow forward to port 443 inside the container, while it can go through a different port on the host.
For instance, it is ok to have port 443 on router (wan) forward to port 444 on the host, and then map port 444 to port 443 in docker run/create or compose yml.
Port 80 forwarding is required for http validation only. Same rule as above applies, and it's OK to go from 80 on the router to 81 on the host, mapped to 80 in the container.
Docker networking
SWAG container happily runs with bridge networking. However, the default bridge network in docker does not allow containers to connect each other via container names used as dns hostnames. Therefore, it is recommended to first create a user defined bridge network and attach the containers to that network.
If you are using docker compose, and your services are on the same yaml, you do not need to do this, because docker compose automatically creates a user defined bridge network and attaches each container to it as long as no other networking option is defined in their config.
For the below examples, we will use a network named lsio (only for the cli created containers). We can create it via docker network create lsio. After that, any container that is created with --net=lsio can ping each other by container name as dns hostname.
Info
Keep in mind that dns hostnames are meant to be case-insensitive, however container names are case-sensitive. For container names to be used as dns hostnames in nginx, they should be all lowercase as nginx will convert them to all lowercase before trying to resolve.
Container setup examples
Create container via http validation
Let's assume our domain name is linuxserver-test.com and we would like our cert to also cover www.linuxserver-test.com and ombi.linuxserver-test.com. On the router, forward ports 80 and 443 to your host server. On your dns provider (if using your own domain), create an A record for the main domain and point it to your server IP (wan). Also create CNAMES for www and ombi and point them to the A record for the domain.
With docker cli, we'll first create a user defined bridge network if we haven't already docker network create lsio, and then create the container:
docker create \
  --name=swag \
  --cap-add=NET_ADMIN \
  --net=lsio \
  -e PUID=1000 \
  -e PGID=1000 \
  -e TZ=Europe/London \
  -e URL=linuxserver-test.com \
  -e SUBDOMAINS=www,ombi \
  -e VALIDATION=http \
  -p 443:443 \
  -p 80:80 \
  -v /home/aptalca/appdata/swag:/config \
  --restart unless-stopped \
  lscr.io/linuxserver/swag
Once created, we do docker start swag to start it.
With docker compose, we can use the following yml:
---
version: "2.1"
services:
  swag:
    image: lscr.io/linuxserver/swag
    container_name: swag
    cap_add:
      - NET_ADMIN
    environment:
      - PUID=1000
      - PGID=1000
      - TZ=Europe/London
      - URL=linuxserver-test.com
      - SUBDOMAINS=www,ombi
      - VALIDATION=http
    volumes:
      - /home/aptalca/appdata/swag:/config
    ports:
      - 443:443
      - 80:80
    restart: unless-stopped
We can fire up the container with docker-compose up -d
After the container is started, we'll watch the logs with docker logs swag -f. After some initial initialization, we will see the validation steps. After all the steps, it should print Server ready in the logs.
Now we can browse to https://www.linuxserver-test.com and we'll see the default landing page displayed.
Create container via dns validation with a wildcard cert
Let's assume our domain name is linuxserver-test.com and we would like our cert to also cover www.linuxserver-test.com, ombi.linuxserver-test.com and any other subdomain possible. On the router, we'll forward port 443 to our host server (Port 80 forwarding is optional).
We'll need to make sure that we are using a dns provider that is supported by this image. Currently the following dns plugins are supported: cloudflare, cloudxns, digitalocean, dnsimple, dnsmadeeasy, google, luadns, nsone, ovh, rfc2136, route53, and many others (see the docker-swag repo for an up to date list). Your dns provider by default is the provider of your domain name and if they are not supported, it is very easy to switch to a different dns provider. Cloudflare is recommended due to being free and reliable. To switch to Cloudflare, you can register for a free account and follow their steps to point the nameservers to Cloudflare. The rest of the instructions assume that we are using the cloudflare dns plugin.
On our dns provider, we'll create an A record for the main domain and point it to our server IP (wan). We'll also create a CNAME for * and point it to the A record for the domain. On Cloudflare, we'll click on the orange cloud to turn it grey so that it is dns only and not cached/proxied by Cloudflare, which would add more complexities.
Now, let's get the container set up.
With docker cli, we'll first create a user defined bridge network if we haven't already docker network create lsio, and then create the container:
docker create \
  --name=swag \
  --cap-add=NET_ADMIN \
  --net=lsio \
  -e PUID=1000 \
  -e PGID=1000 \
  -e TZ=Europe/London \
  -e URL=linuxserver-test.com \
  -e SUBDOMAINS=wildcard \
  -e VALIDATION=dns \
  -e DNSPLUGIN=cloudflare \
  -p 443:443 \
  -p 80:80 \
  -v /home/aptalca/appdata/swag:/config \
  --restart unless-stopped \
  lscr.io/linuxserver/swag
And we start the container via docker start swag
With docker compose, we'll use:
---
version: "2.1"
services:
  swag:
    image: lscr.io/linuxserver/swag
    container_name: swag
    cap_add:
      - NET_ADMIN
    networks:
      - lsio
    environment:
      - PUID=1000
      - PGID=1000
      - TZ=Europe/London
      - URL=linuxserver-test.com
      - SUBDOMAINS=wildcard
      - VALIDATION=dns
      - DNSPLUGIN=cloudflare
    volumes:
      - /home/aptalca/appdata/swag:/config
    ports:
      - 443:443
      - 80:80
    restart: unless-stopped
Then we'll fire up the container via docker-compose up -d
After the container is started, we'll watch the logs with docker logs swag -f. After some init steps, we'll notice that the container will give an error during validation due to wrong credentials. That's because we didn't enter the correct credentials for the Cloudflare API yet. We can browse to the location /config/dns-conf which is mapped from the host location (according to above settings) /home/aptalca/appdata/swag/dns-conf/ and edit the correct ini file for our dns provider. For Cloudflare, we'll enter our API token. The API token can be created by going to My Profile->API Tokens and creating a token with the Edit DNS permission on the DNS zones for which you wish to request certificates. In the cloudflare.ini comment out the dns_cloudflare_email and dns_cloudflare_api_key values, then uncomment dns_cloudflare_api_token and add your API token against it.
Once we enter the credentials into the ini file, we'll restart the docker container via docker restart swag and again watch the logs. After successful validation, we should see the notice Server ready and our webserver should be up and accessible at https://www.linuxserver-test.com.
Create container via duckdns validation with a wildcard cert
We will first need to get a subdomain from DuckDNS. Let's assume we get linuxserver-test so our url will be linuxserver-test.duckdns.org. Then we'll need to make sure that the subdomain points to our server IP (wan) on the DuckDNS website. We can always use our DuckDNS docker image to keep the IP up to date. Don't forget to get the token for your account from DuckDNS. On the router, we'll forward port 443 to our host server (Port 80 forward is optional).
Now, let's get the container set up.
With docker cli, we'll first create a user defined bridge network if we haven't already docker network create lsio, and then create the container:
docker create \
  --name=swag \
  --cap-add=NET_ADMIN \
  --net=lsio \
  -e PUID=1000 \
  -e PGID=1000 \
  -e TZ=Europe/London \
  -e URL=linuxserver-test.duckdns.org \
  -e SUBDOMAINS=wildcard \
  -e VALIDATION=dns \
  -e DNSPLUGIN=duckdns \
  -p 443:443 \
  -p 80:80 \
  -v /home/aptalca/appdata/swag:/config \
  --restart unless-stopped \
  lscr.io/linuxserver/swag
And we start the container via docker start swag
With docker compose, we'll use:
---
version: "2.1"
services:
  swag:
    image: lscr.io/linuxserver/swag
    container_name: swag
    cap_add:
      - NET_ADMIN
    environment:
      - PUID=1000
      - PGID=1000
      - TZ=Europe/London
      - URL=linuxserver-test.duckdns.org
      - SUBDOMAINS=wildcard
      - VALIDATION=dns
      - DNSPLUGIN=duckdns
    volumes:
      - /home/aptalca/appdata/swag:/config
    ports:
      - 443:443
      - 80:80
    restart: unless-stopped
Then we'll fire up the container via docker-compose up -d
After the container is started, we'll watch the logs with docker logs swag -f. After some init steps, we'll notice that the container will give an error during validation due to wrong credentials. That's because we didn't enter the correct credentials for the Cloudflare API yet. We can browse to the location /config/dns-conf which is mapped from the host location (according to above settings) /home/aptalca/appdata/swag/dns-conf/ and edit the correct ini file for our dns provider. For DuckDNS, we'll enter our API token. The API token can be retrieved from the DuckDNS admin interface.
Once we enter the credentials into the ini file, we'll restart the docker container via docker restart swag and again watch the logs. After successful validation, we should see the notice Server ready and our webserver should be up and accessible at https://www.linuxserver-test.duckdns.org.
Warning
Due to a DuckDNS limitation, our cert only covers the wildcard subdomains, but it doesn't cover the main url. So if we try to access https://linuxserver-test.duckdns.org, we'll see a browser warning about an invalid ssl cert. But accessing it through the www (or ombi or any other) subdomain should work fine.
Web hosting examples
Simple html web page hosting
Once we have a working container, we can drop our web documents in and modify the nginx config files to set up our webserver.
All the necessary files are under /config which is mapped from the host location (set by above examples) /home/aptalca/appdata/swag.
We can drop all of our web/html files into /config/www.
The main site config nginx uses can be found at /config/nginx/site-confs/default. Don't delete this file, as it will be regenerated on container restart, but feel free to modify as needed. By default, it is listening on port 443, and the root folder is set to /config/www, so if you drop a page1.html into that location, it will be accessible at https://linuxserver-test.com/page1.html.
To enable listening on port 80 and automatically redirecting to port 443 for enforcing ssl, uncomment the lines at the top of the default site config so it reads:
# redirect all traffic to https
server {
    listen 80;
    listen [::]:80;
    server_name _;
    return 301 https://$host$request_uri;
}
After any changes to the config files, simply restart the container via docker restart swag to reload the nginx config.
Hosting a Wordpress site
Wordpress requires a mysql database. For that, we'll use the linuxserver MariaDB docker image.
Here's a docker compose stack to get both containers set up. For this exercise, we'll utilize the cloudflare dns plugin for Let's Encrypt validation, but you can use any other method to set it up as described in this linked section:
---
version: "2.1"
services:
  mariadb:
    image: lscr.io/linuxserver/mariadb
    container_name: mariadb
    environment:
      - PUID=1000
      - PGID=1000
      - MYSQL_ROOT_PASSWORD=mariadbpassword
      - TZ=Europe/London
      - MYSQL_DATABASE=WP_database
      - MYSQL_USER=WP_dbuser
      - MYSQL_PASSWORD=WP_dbpassword
    volumes:
      - /home/aptalca/appdata/mariadb:/config
    restart: unless-stopped
  swag:
    image: lscr.io/linuxserver/swag
    container_name: swag
    cap_add:
      - NET_ADMIN
    environment:
      - PUID=1000
      - PGID=1000
      - TZ=Europe/London
      - URL=linuxserver-test.com
      - SUBDOMAINS=wildcard
      - VALIDATION=dns
      - DNSPLUGIN=cloudflare
    volumes:
      - /home/aptalca/appdata/swag:/config
    ports:
      - 443:443
      - 80:80
    depends_on:
      - mariadb
    restart: unless-stopped
And here are the docker cli versions (make sure you already created the lsio network as described above: Mariadb:
docker create \
  --name=mariadb \
  --net=lsio \
  -e PUID=1000 \
  -e PGID=1000 \
  -e MYSQL_ROOT_PASSWORD=mariadbpassword \
  -e TZ=Europe/London \
  -e MYSQL_DATABASE=WP_database \
  -e MYSQL_USER=WP_dbuser \
  -e MYSQL_PASSWORD=WP_dbpassword \
  -v /home/aptalca/appdata/mariadb:/config \
  --restart unless-stopped \
  lscr.io/linuxserver/mariadb
SWAG:
docker create \
  --name=swag \
  --cap-add=NET_ADMIN \
  --net=lsio \
  -e PUID=1000 \
  -e PGID=1000 \
  -e TZ=Europe/London \
  -e URL=linuxserver-test.com \
  -e SUBDOMAINS=wildcard \
  -e VALIDATION=dns \
  -e DNSPLUGIN=cloudflare \
  -p 443:443 \
  -p 80:80 \
  -v /home/aptalca/appdata/swag:/config \
  --restart unless-stopped \
  lscr.io/linuxserver/swag
Once the SWAG container is set up with ssl certs and the webserver is up, we'll download the latest Wordpress and untar it into our www folder:
wget https://wordpress.org/latest.tar.gz
tar xvf latest.tar.gz -C /home/aptalca/appdata/swag/www/
rm latest.tar.gz
Now that we have all the Wordpress files under the container's /config/www/wordpress folder, we'll need to make some adjustments to the nginx configurations.
- Find the line in
/config/nginx/site-confs/defaultthat readsroot /config/www;and change it toroot /config/www/wordpress; - Find the line in
/config/nginx/site-confs/defaultthat readstry_files $uri $uri/ /index.html /index.php$is_args$args =404;and change it totry_files $uri $uri/ /index.html /index.php$is_args$args;
Alternatively, if you need to run multiple instances of Wordpress, you can leave /config/nginx/site-confs/default entirely unchanged and create new site-confs for each instance of Wordpress. The new site-confs will be slimmed down copies of /config/nginx/site-confs/default. This assumes you will run each instance on a separate subdomain. If you would prefer to have each Wordpress site on a different top level domain, be sure to add each domain to the EXTRA_DOMAINS environment variable.
Ex: /config/nginx/site-confs/myfirstsubdomain.linuxserver-test.com.conf
server {
    listen 443 ssl http2; # REMOVED default_server
    listen [::]:443 ssl http2; # REMOVED default_server

    server_name myfirstsubdomain.linuxserver-test.com; # PUT YOUR DOMAIN HERE

    include /config/nginx/ssl.conf;

    root /config/sites/myfirstsubdomain.linuxserver-test.com/www; # CREATE THIS DIRECTORY STRUCTURE AND PUT WORDPRESS FILES HERE
    index index.html index.htm index.php;

    location / {
        try_files $uri $uri/ /index.html /index.php$is_args$args; # REMOVED =404
    }

    location ~ ^(.+\.php)(.*)$ {
        fastcgi_split_path_info ^(.+\.php)(.*)$;
        fastcgi_pass 127.0.0.1:9000;
        fastcgi_index index.php;
        include /etc/nginx/fastcgi_params;
    }

    # deny access to .htaccess/.htpasswd files
    location ~ /\.ht {
        deny all;
    }
}
/config/nginx/site-confs/mysecondsubdomain.linuxserver-test.com.conf
server {
    listen 443 ssl http2; # REMOVED default_server
    listen [::]:443 ssl http2; # REMOVED default_server

    server_name mysecondsubdomain.linuxserver-test.com; # PUT YOUR DOMAIN HERE

    include /config/nginx/ssl.conf;

    root /config/sites/mysecondsubdomain.linuxserver-test.com/www; # CREATE THIS DIRECTORY STRUCTURE AND PUT WORDPRESS FILES HERE
    index index.html index.htm index.php;

    location / {
        try_files $uri $uri/ /index.html /index.php$is_args$args; # REMOVED =404
    }

    location ~ ^(.+\.php)(.*)$ {
        fastcgi_split_path_info ^(.+\.php)(.*)$;
        fastcgi_pass 127.0.0.1:9000;
        fastcgi_index index.php;
        include /etc/nginx/fastcgi_params;
    }

    # deny access to .htaccess/.htpasswd files
    location ~ /\.ht {
        deny all;
    }
}
Now that you have completed changing your nginx configurations you need to restart the SWAG container.
Now we should be able to access our Wordpress config page at https://linuxserver-test.com/wp-admin/install.php. We'll go ahead and enter mariadb as the Database Host address (we are using the container name as the dns hostname since both containers are in the same user defined bridge network), and also enter the Database Name, user and password we used in the mariadb config above (WP_database, WP_dbuser and WP_dbpassword).
Once we go through the rest of the install steps, our Wordpress instance should be fully set up and available at https://linuxserver-test.com.
If you would like to have http requests on port 80 enabled and auto redirected to https on port 443, uncomment the relevant lines at the top of the default site config to read:
# redirect all traffic to https
server {
    listen 80;
    listen [::]:80;
    server_name _;
    return 301 https://$host$request_uri;
}
Reverse Proxy
A reverse proxy is a type of proxy server that retrieves resources on behalf of a client from one or more servers. These resources are then returned to the client as if they originated from the Web server itself (Shamelessly borrowed from another post on our blog).
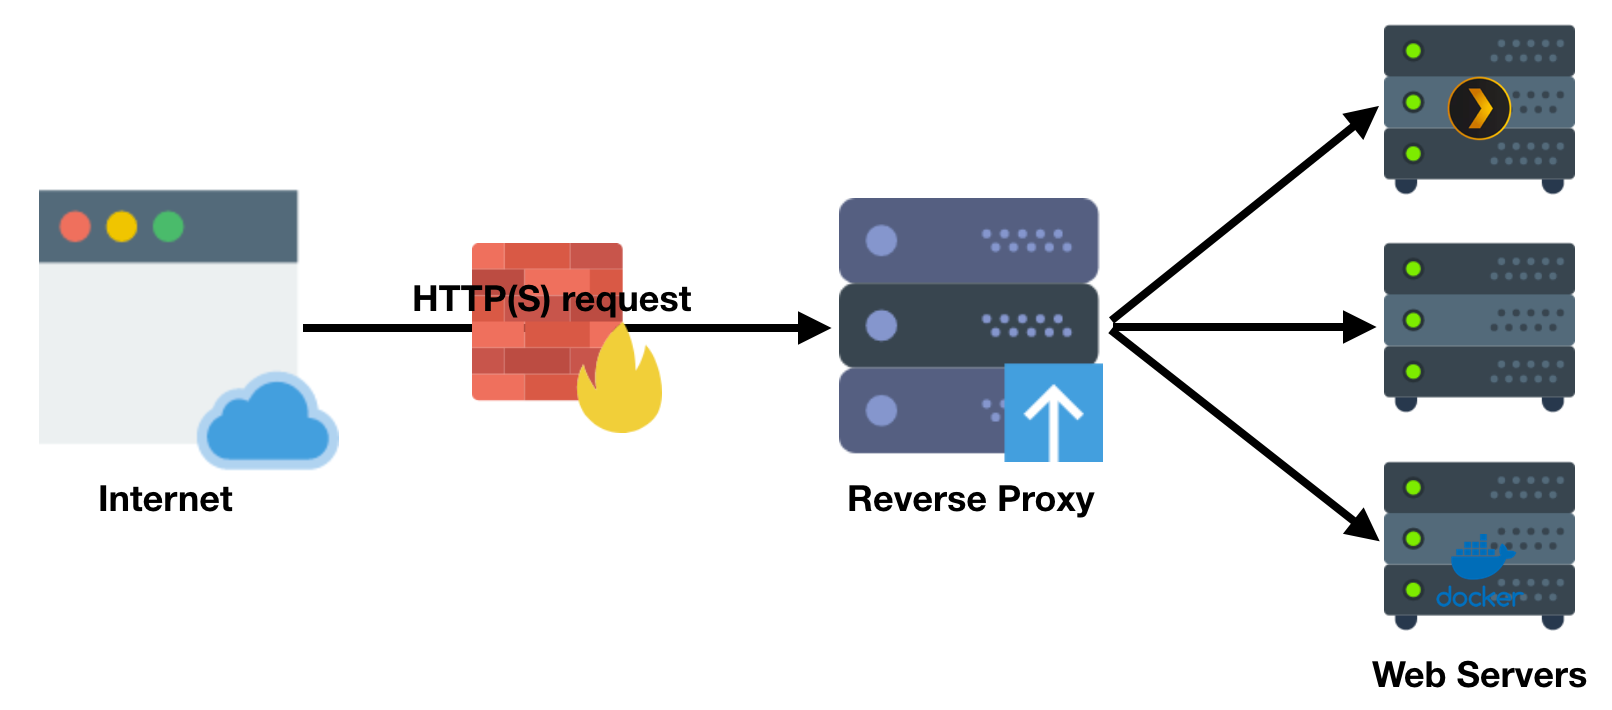
In this case, a user or a client browser can connect to our SWAG container via https on port 443, request a service such as Ombi, then our SWAG container connects to the ombi container, retrieves the data and passes it on to the client via https with our trusted cert. The connection to ombi is local and does not need to be encrypted, but all communication between our SWAG container and the client browser will be encrypted.
Preset proxy confs
Our SWAG image comes with a list of preset reverse proxy confs for popular apps and services. They are hosted on Github and are pulled into the /config/nginx/proxy-confs folder as inactive sample files. To activate, one must rename a conf file to remove .sample from the filename and restart the SWAG container. Any proxy conf file in that folder with a name that matches *.subdomain.conf or *.subfolder.conf will be loaded in nginx during container start.
Most proxy confs work without any modification, but some may require other changes. All the required changes are listed at the top of each proxy conf. The conf files use container names to reach other containers and therefore the proxied containers should be named the same as listed in our documentation for each container.
The conf files also require that the SWAG container is in the same user defined bridge network as the other container so they can reach each other via container name as dns hostnames. Make sure you follow the instructions listed above in the Docker networking section.
Understanding the proxy conf structure
Subdomain proxy conf
Here's the preset proxy conf for Heimdall as a subdomain (ie. https://heimdall.linuxserver-test.com):
# make sure that your dns has a cname set for heimdall

server {
    listen 443 ssl;
    listen [::]:443 ssl;

    server_name heimdall.*;

    include /config/nginx/ssl.conf;

    client_max_body_size 0;

    # enable for ldap auth, fill in ldap details in ldap.conf
    #include /config/nginx/ldap.conf;

    # enable for Authelia
    #include /config/nginx/authelia-server.conf;

    location / {
        # enable the next two lines for http auth
        #auth_basic "Restricted";
        #auth_basic_user_file /config/nginx/.htpasswd;

        # enable the next two lines for ldap auth
        #auth_request /auth;
        #error_page 401 =200 /ldaplogin;

        # enable for Authelia
        #include /config/nginx/authelia-location.conf;

        include /config/nginx/proxy.conf;
        resolver 127.0.0.11 valid=30s;
        set $upstream_app heimdall;
        set $upstream_port 443;
        set $upstream_proto https;
        proxy_pass $upstream_proto://$upstream_app:$upstream_port;

    }
}
Let's dissect this conf to look at what each directive or block does.
This is our server block. Whenever nginx gets a request from a client, it determines which server block should be processed based on the destination server name, port and other relevant info, and the matching server block determines how nginx handles and responds to the request.
This means that only requests coming to port 443 will match this server block.
Only destination addresses that match heimdall.* will match this server block.
This directive injects the contents of our ssl.conf file here, which contains all ssl related settings (cert location, ciphers used, etc.).
Removes the size limitation on uploads (default 1MB).
Commented out (disabled) by default. When enabled, it will inject the contents of ldap.conf, necessary settings for LDAP auth.
Commented out (disabled) by default. When enabled, it will inject the contents of authelia-server.conf, necessary settings for Authelia integration.
Location blocks are used for subfolders or paths. After a server block is matched, nginx will look at the subfolder or path requested to match one of the location blocks inside the selected server block. This particular block in our example is for / so it will match any subfolder or path at this address.
        # enable the next two lines for http auth
        #auth_basic "Restricted";
        #auth_basic_user_file /config/nginx/.htpasswd;
Commented out (disabled) by default. When enabled, it will use .htpasswd to perform user/pass authentication before allowing access.
Commented out (disabled) by default. When enabled, it will use LDAP authentication before allowing access.
Commented out (disabled) by default. When enabled, it will use Authelia authentication before allowing access.
Injects the contents of proxy.conf, which contains various directives and headers that are common for proxied connections.
Tells nginx to use the docker dns to resolve the IP address when the container name is used as address in the next line.
        set $upstream_app heimdall;
        set $upstream_port 443;
        set $upstream_proto https;
        proxy_pass $upstream_proto://$upstream_app:$upstream_port;
This is a bit of a tricky part. Normally, we could just put in the directive proxy_pass https://heimdall:443; and expect nginx to connect to Heimdall via its container name used as a dns hostname. Although it works for the most part, nginx has an annoying habit. During start, nginx checks all dns hostnames used in proxy_pass statements and if any one of them is not accessible, it refuses to start. We really don't want a stopped proxied container to prevent our webserver from starting up, so we use a trick.
If the proxy_pass statement contains a variable instead of a dns hostname, nginx doesn't check whether it's accessible or not during start. So here we are setting 3 variables, one named upstream_app with the value of heimdall, one named $upstream_port, with the value of the internal heimdall port 443, and one named $upstream_proto with the value set to https. We we use these variables as the address in the proxy_pass directive. That way, if the heimdall container is down for any reason, nginx can still start. When using a variable instead of hostname, we also have to set the resolver to docker dns in the previous line.
If the proxied container is not in the same user defined bridge network as SWAG (could be on a remote host, could be using host networking or macvlan), we can change the value of $upstream_app to an IP address instead: set $upstream_app 192.168.1.10;
Subfolder proxy conf
Here's the preset proxy conf for mytinytodo via a subfolder
# works with https://github.com/breakall/mytinytodo-docker
# set the mtt_url to 'https://your.domain.com/todo/' in db/config.php

location /todo {
    return 301 $scheme://$host/todo/;
}
location ^~ /todo/ {

    # enable the next two lines for http auth
    #auth_basic "Restricted";
    #auth_basic_user_file /config/nginx/.htpasswd;

    # enable the next two lines for ldap auth, also customize and enable ldap.conf in the default conf
    #auth_request /auth;
    #error_page 401 =200 /ldaplogin;

    # enable for Authelia, also enable authelia-server.conf in the default site config
    #include /config/nginx/authelia-location.conf;

    include /config/nginx/proxy.conf;
    resolver 127.0.0.11 valid=30s;
    set $upstream_app mytinytodo;
    set $upstream_port 80;
    set $upstream_proto http;
    proxy_pass $upstream_proto://$upstream_app:$upstream_port/;
}
Unlike the subdomain proxy confs, here we do not have a server block. That is because all of the subfolder proxy confs get injected into the main server block of our root domain defined in the default site conf. So here we are only defining the location block for our specific subfolders.
Many of the elements are the same as the subdomain ones, so for those you can refer to the previous section. Let's take a look at some of the differences.
# works with https://github.com/breakall/mytinytodo-docker
# set the mtt_url to 'https://your.domain.com/todo/' in db/config.php
These are the instructions to get the tinytodo container ready to work with our reverse proxy.
Redirects requests for https://linuxserver-test.com/todo to https://linuxserver-test.com/todo/ (added forward slash at the end).
Any requests sent to nginx where the destination starts with https://linuxserver-test.com/todo/ will match this location block.
    set $upstream_app mytinytodo;
    set $upstream_port 80;
    set $upstream_proto http;
    proxy_pass $upstream_proto://$upstream_app:$upstream_port/;
Same as the previous example, we set a variable $upstream_app with the value mytinytodo and tell nginx to use the variable as the address. Keep in mind that the port listed here is the container port because nginx is connecting to this container directly via the docker network. So if our mytinytodo container has a port mapping of -p 8080:80, we still set $upstream_port variable to 80.
Info
Nginx has an interesting behavior displayed here. Even though we define http://$upstream_mytinytodo:80/ as the address nginx should proxy, nginx actually connects to http://$upstream_mytinytodo:80/todo. Whenever we use a variable as part of the proxy_pass url, nginx automatically appends the defined location (in this case /todo) to the end of the proxy_pass url before it connects. If we include the subfolder, nginx will try to connect to http://$upstream_mytinytodo:80/todo/todo and will fail.
Ombi subdomain reverse proxy example
In this example, we will reverse proxy Ombi at the address https://ombi.linuxserver-test.com.
First let's make sure that we have a CNAME for ombi set up on our dns provider (a wildcard CNAME * will also cover this) and it is pointing to our A record that points to our server IP. If we are using the docker cli method, we also need to create the user defined bridge network (here named lsio) as described above. We also need to make sure that port 443 on our router is forwarded to the correct port on our server.
Here's a docker compose stack we can use to set up both containers:
---
version: "2.1"
services:
  ombi:
    image: lscr.io/linuxserver/ombi
    container_name: ombi
    environment:
      - PUID=1000
      - PGID=1000
      - TZ=Europe/London
    volumes:
      - /home/aptalca/appdata/ombi:/config
    ports:
      - 3579:3579
    restart: unless-stopped
  swag:
    image: lscr.io/linuxserver/swag
    container_name: swag
    cap_add:
      - NET_ADMIN
    environment:
      - PUID=1000
      - PGID=1000
      - TZ=Europe/London
      - URL=linuxserver-test.com
      - SUBDOMAINS=wildcard
      - VALIDATION=dns
      - DNSPLUGIN=cloudflare
    volumes:
      - /home/aptalca/appdata/swag:/config
    ports:
      - 443:443
      - 80:80
    restart: unless-stopped
And here are the docker cli versions: Ombi:
docker create \
  --name=ombi \
  --net=lsio \
  -e PUID=1000 \
  -e PGID=1000 \
  -e TZ=Europe/London \
  -p 3579:3579 \
  -v /home/aptalca/appdata/ombi:/config \
  --restart unless-stopped \
  lscr.io/linuxserver/ombi
SWAG:
docker create \
  --name=swag \
  --cap-add=NET_ADMIN \
  --net=lsio \
  -e PUID=1000 \
  -e PGID=1000 \
  -e TZ=Europe/London \
  -e URL=linuxserver-test.com \
  -e SUBDOMAINS=wildcard \
  -e VALIDATION=dns \
  -e DNSPLUGIN=cloudflare \
  -p 443:443 \
  -p 80:80 \
  -v /home/aptalca/appdata/swag:/config \
  --restart unless-stopped \
  lscr.io/linuxserver/swag
Once our containers up and running (and we confirm we can reach the placeholder page at https://linuxserver-test.com), we simply rename the file ombi.subdomain.conf.sample under /config/nginx/proxy-confs/ to ombi.subdomain.conf and we restart the SWAG container. Now when we browser to https://ombi.linuxserver-test.com we should see the Ombi gui.
Nextcloud subdomain reverse proxy example
Nextcloud is a bit trickier because the app has various security measures built-in, forcing us to configure certain options manually.
As with the other examples, let's make sure that we have a CNAME for nextcloud set up on our dns provider (a wildcard CNAME * will also cover this) and it is pointing to our A record that points to our server IP. If we are using the docker cli method, we also need to create the user defined bridge network (here named lsio) as described above. For DuckDNS, we do not need to create CNAMES, as all sub-subdomains automatically point to the same IP as our custom subdomain, but we need to make sure that it is the correct IP address for our server. We also need to make sure that port 443 on our router is forwarded to the correct port on our server.
In this example we'll use the duckdns wildcard cert, but you can use any Let's Encrypt validation you like as described above
Here's a docker compose stack to set up our SWAG, nextcloud and mariadb containers:
---
version: "2.1"
services:
  nextcloud:
    image: lscr.io/linuxserver/nextcloud
    container_name: nextcloud
    environment:
      - PUID=1000
      - PGID=1000
      - TZ=Europe/London
    volumes:
      - /home/aptalca/appdata/nextcloud/config:/config
      - /home/aptalca/appdata/nextcloud/data:/data
    depends_on:
      - mariadb
    restart: unless-stopped
  mariadb:
    image: lscr.io/linuxserver/mariadb
    container_name: mariadb
    environment:
      - PUID=1000
      - PGID=1000
      - MYSQL_ROOT_PASSWORD=mariadbpassword
      - TZ=Europe/London
      - MYSQL_DATABASE=nextcloud
      - MYSQL_USER=ncuser
      - MYSQL_PASSWORD=ncpassword
    volumes:
      - /home/aptalca/appdata/mariadb:/config
    restart: unless-stopped
  swag:
    image: lscr.io/linuxserver/swag
    container_name: swag
    cap_add:
      - NET_ADMIN
    environment:
      - PUID=1000
      - PGID=1000
      - TZ=Europe/London
      - URL=linuxserver-test.duckdns.org
      - SUBDOMAINS=wildcard
      - VALIDATION=duckdns
      - DUCKDNSTOKEN=97654867496t0877648659765854
    volumes:
      - /home/aptalca/appdata/swag:/config
    ports:
      - 443:443
      - 80:80
    restart: unless-stopped
And here are the docker cli versions: Nextcloud:
docker create \
  --name=nextcloud \
  --net=lsio
  -e PUID=1000 \
  -e PGID=1000 \
  -e TZ=Europe/London \
  -v /home/aptalca/appdata/nextcloud/config:/config \
  -v /home/aptalca/appdata/nextcloud/data:/data \
  --restart unless-stopped \
  lscr.io/linuxserver/nextcloud
Mariadb:
docker create \
  --name=mariadb \
  --net=lsio \
  -e PUID=1000 \
  -e PGID=1000 \
  -e MYSQL_ROOT_PASSWORD=mariadbpassword \
  -e TZ=Europe/London \
  -e MYSQL_DATABASE=nextcloud \
  -e MYSQL_USER=ncuser \
  -e MYSQL_PASSWORD=ncpassword \
  -v /home/aptalca/appdata/mariadb:/config \
  --restart unless-stopped \
  lscr.io/linuxserver/mariadb
SWAG:
docker create \
  --name=swag \
  --cap-add=NET_ADMIN \
  --net=lsio \
  -e PUID=1000 \
  -e PGID=1000 \
  -e TZ=Europe/London \
  -e URL=linuxserver-test.duckdns.org \
  -e SUBDOMAINS=wildcard \
  -e VALIDATION=duckdns \
  -e DUCKDNSTOKEN=97654867496t0877648659765854 \
  -p 443:443 \
  -p 80:80 \
  -v /home/aptalca/appdata/swag:/config \
  --restart unless-stopped \
  lscr.io/linuxserver/swag
Now we find the file named nextcloud.subdomain.conf.sample under SWAG's /config/nginx/proxy-confs folder and rename it to nextcloud.subdomain.conf, then restart the SWAG container.
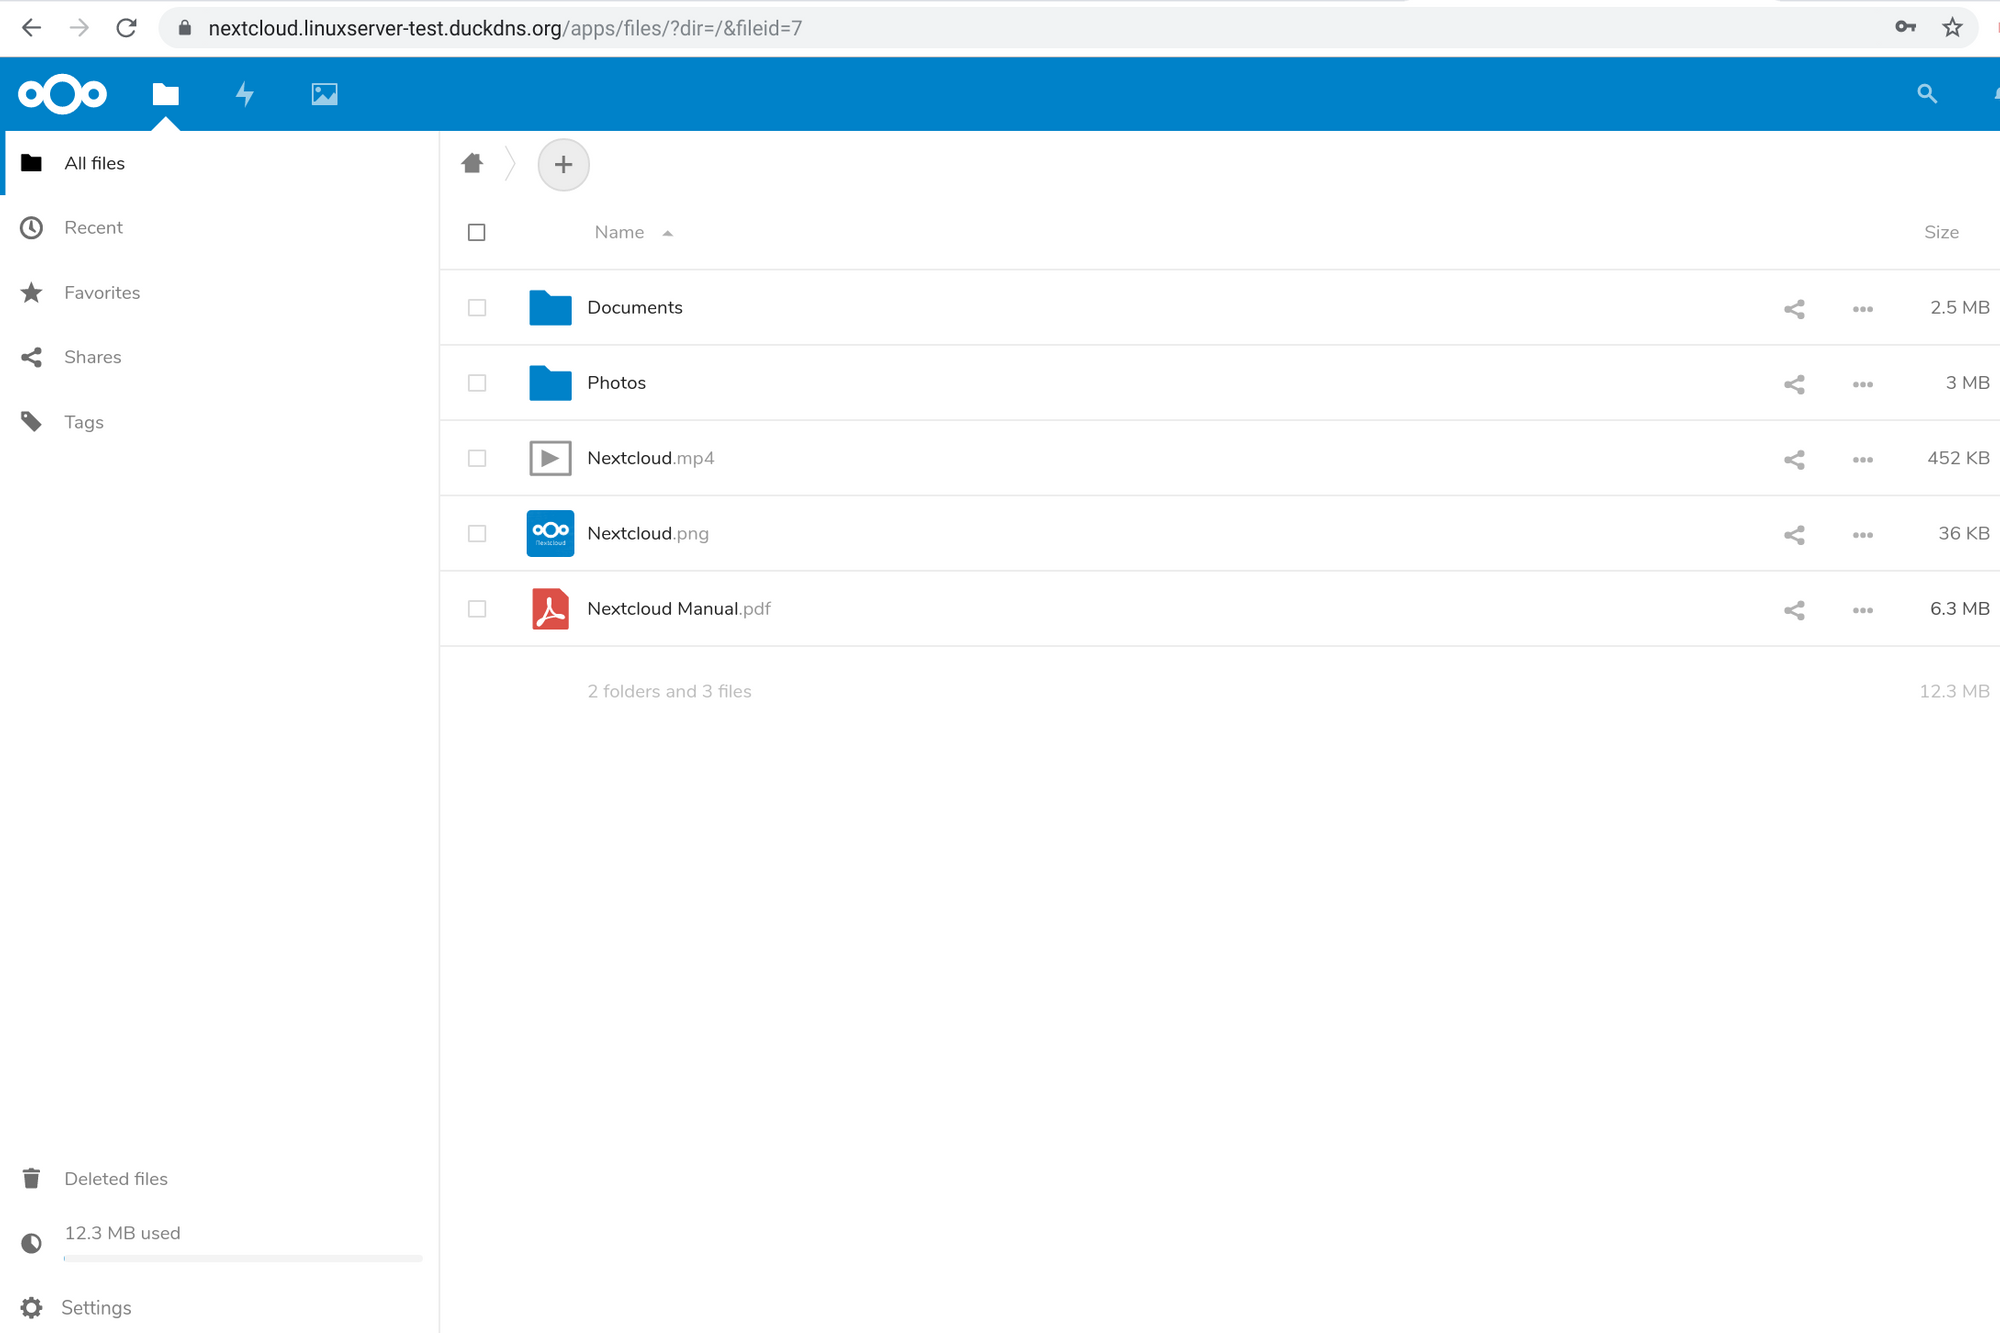
If this is the first time we are accessing Nextcloud (we've never accessed it locally before), we can simply navigate to https://nextcloud.linuxserver-test.duckdns.org and we should see the Nextcloud set up page. We'll fill out the info, use the mariadb user ncuser and the password we selected in the environment variable (ncpassword in the above example) and we'll use mariadb as the Database Host address (container name as dns hostname).
We should then be able to go through the intro slides and then see the Nextcloud dashboard with our shiny padlock icon next to the address bar.
If this is an existing Nextcloud instance, or we set it up locally via the host IP address and local port, Nextcloud will reject proxied connections. In that case, we have to follow the instructions at the top of the nextcloud.subdomain.conf file:
# assuming this container is called "swag", edit your nextcloud container's config
# located at /config/www/nextcloud/config/config.php and add the following lines before the ");":
#  'trusted_proxies' => ['swag'],
#  'overwrite.cli.url' => 'https://nextcloud.your-domain.com/',
#  'overwritehost' => 'nextcloud.your-domain.com',
#  'overwriteprotocol' => 'https',
#
# Also don't forget to add your domain name to the trusted domains array. It should look somewhat like this:
#  array (
#    0 => '192.168.0.1:444', # This line may look different on your setup, don't modify it.
#    1 => 'nextcloud.your-domain.com',
#  ),
These settings will tell Nextcloud to respond to queries where the destination address is our domain name.
If you followed the above directions to set it up for the first time, you only need to add the line
'trusted_proxies' => ['swag'],, otherwise nextcloud 16+ shows a warning about incorrect reverse proxy settings. By default, HSTS is disabled in SWAG config, because it is a bit of a sledgehammer that prevents loading of any http assets on the entire domain. You can enable it in SWAG'sssl.conf.
Plex subfolder reverse proxy example
In this example, we will set up Plex as a subfolder so it will be accessible at https://linuxserver-test.com/plex. We will initially set up Plex with host networking through its local IP and will connect to it from the same subnet. If we are on a different subnet, or if using a bridge network, we can use the PLEX_CLAIM variable to automatically claim the server with our plex account.
Once the Plex server is set up, it is safe to switch it to bridge networking from host.
Here's a docker compose stack we can use to set up both containers:
---
version: "2.1"
services:
  plex:
    image: lscr.io/linuxserver/plex
    container_name: plex
    network_mode: host
    environment:
      - PUID=1000
      - PGID=1000
      - VERSION=docker
    volumes:
      - /home/aptalca/appdata/plex:/config
      - /home/aptalca/tvshows:/data/tvshows
      - /home/aptalca/movies:/data/movies
    restart: unless-stopped
  swag:
    image: lscr.io/linuxserver/swag
    container_name: swag
    cap_add:
      - NET_ADMIN
    environment:
      - PUID=1000
      - PGID=1000
      - TZ=Europe/London
      - URL=linuxserver-test.com
      - SUBDOMAINS=wildcard
      - VALIDATION=dns
      - DNSPLUGIN=cloudflare
    volumes:
      - /home/aptalca/appdata/swag:/config
    ports:
      - 443:443
      - 80:80
    restart: unless-stopped
Here are the docker cli versions: Plex:
docker create \
  --name=plex \
  --net=host \
  -e PUID=1000 \
  -e PGID=1000 \
  -e VERSION=docker \
  -v /home/aptalca/appdata/plex:/config \
  -v /home/aptalca/tvshows:/data/tvshows \
  -v /home/aptalca/movies:/data/movies \
  --restart unless-stopped \
  lscr.io/linuxserver/plex
SWAG:
docker create \
  --name=swag \
  --cap-add=NET_ADMIN \
  --net=lsio \
  -e PUID=1000 \
  -e PGID=1000 \
  -e TZ=Europe/London \
  -e URL=linuxserver-test.com \
  -e SUBDOMAINS=wildcard \
  -e VALIDATION=dns \
  -e DNSPLUGIN=cloudflare \
  -p 443:443 \
  -p 80:80 \
  -v /home/aptalca/appdata/swag:/config \
  --restart unless-stopped \
  lscr.io/linuxserver/swag
Once the containers are set up, we browse to http://LOCALSERVERIP:32400/web and set up our Plex server with our Plex account. Then we can find the file named plex.subfolder.conf.sample under our SWAG container's /config/nginx/proxy-confs folder and rename it to plex.subfolder.conf.
If we are using bridge networking for our plex container, we can restart the SWAG container and we should be able to access Plex at https://linuxserver-test.com/plex.
If we are using host networking for our plex container, we will also have to make one modification to the plex.subfolder.conf. We need to find the line that reads proxy_pass http://$upstream_plex:32400; and replace $upstream_plex with our Plex server's local IP address (ie. proxy_pass http://192.168.1.10:32400;). Then we can restart SWAG and access Plex at https://linuxserver-test.com/plex.
If we want Plex to always use our domain to connect (including in mobile apps), we can add our url https://linuxserver-test.com/plex into the Custom server access URLs in Plex server settings. After that, it is OK to turn off remote access in Plex server settings and remove the port forwarding port 32400. After that, all connections to our Plex server will go through SWAG reverse proxy over port 443.
Using Heimdall as the home page at domain root
In this example, we will set Heimdall as our homepage at domain root so when we navigate to https://linuxserver-test.com we will reach Heimdall.
As before, we need to make sure port 443 is properly forwarded to our server. We also need to make sure that if we are using the docker cli method, we need to create a user defined bridge network as defined above.
Here's a docker compose stack we can use to set up both containers:
---
version: "2.1"
services:
  heimdall:
    image: lscr.io/linuxserver/heimdall
    container_name: heimdall
    environment:
      - PUID=1000
      - PGID=1000
      - TZ=Europe/London
    volumes:
      - /home/aptalca/appdata/heimdall:/config
    restart: unless-stopped
  swag:
    image: lscr.io/linuxserver/swag
    container_name: swag
    cap_add:
      - NET_ADMIN
    environment:
      - PUID=1000
      - PGID=1000
      - TZ=Europe/London
      - URL=linuxserver-test.com
      - SUBDOMAINS=wildcard
      - VALIDATION=dns
      - DNSPLUGIN=cloudflare
    volumes:
      - /home/aptalca/appdata/swag:/config
    ports:
      - 443:443
      - 80:80
    restart: unless-stopped
Here are the docker cli versions: Heimdall:
docker create \
  --name=heimdall \
  --net=lsio \
  -e PUID=1000 \
  -e PGID=1000 \
  -e TZ=Europe/London \
  -v /home/aptalca/appdata/heimdall:/config \
  --restart unless-stopped \
  lscr.io/linuxserver/heimdall
SWAG:
docker create \
  --name=swag \
  --cap-add=NET_ADMIN \
  --net=lsio \
  -e PUID=1000 \
  -e PGID=1000 \
  -e TZ=Europe/London \
  -e URL=linuxserver-test.com \
  -e SUBDOMAINS=wildcard \
  -e VALIDATION=dns \
  -e DNSPLUGIN=cloudflare \
  -p 443:443 \
  -p 80:80 \
  -v /home/aptalca/appdata/swag:/config \
  --restart unless-stopped \
  lscr.io/linuxserver/swag
Once the containers are set up, we'll find the file named heimdall.subfolder.conf.sample under SWAG's /config/nginx/proxy-confs folder and rename it to heimdall.subfolder.conf. If we look inside that conf file, we'll see that it is set to use location / {, which will cause an issue because there is already a location defined for / inside the default site config for SWAG. So we need to edit the default site config at /config/nginx/site-confs/default and comment out the location block for / inside our main server block so it reads:
That way, nginx will use the / location block from our heimdall proxy conf instead.
After that, when we navigate to https://linuxserver-test.com, we'll see the Heimdall interface.
If we want to password protect our new homepage, we can run the following on the host command line to create a new .htpasswd file: docker exec -it swag htpasswd -c /config/nginx/.htpasswd anyusername. After which, we can activate authentication by editing the heimdall.subfolder.conf file to uncomment the relevant lines so it reads:
    # enable the next two lines for http auth
    auth_basic "Restricted";
    auth_basic_user_file /config/nginx/.htpasswd;
Troubleshooting
We wrote a blogpost for the deprecated letsencrypt image diving into troubleshooting issues regarding dns and port-forwards, which still is a very good resource: blog.linuxserver.io
Common errors
404
This error simply means that the resource was not found. Commonly happening when you try to access a subfolder that is not enabled.
502
This error means that nginx can't talk to the application. There is a few common reasons for this:
-
The application and SWAG is not on the same custom docker network
Further up we talk about how to set up Docker networking, however there are some other common traps
-
The container name does not match the application name.
Covered in the section for Understanding the proxy conf structure
-
You manually changed the port.
Also covered in the section for Understanding the proxy conf structure
-
The container originally ran with host networking, or the default bridge.
In most cases the contents of
/config/nginx/resolver.conf;should be...resolver 127.0.0.11 valid=30s;, if this is not the case, you can:- Delete it, and restart the container to have it regenerate
- Manually set the content(we wont override it)
Here are a few troubleshooting steps:
- Try to ping the container from the swag container:
docker exec swag ping <container name>(If your swag container isn't namedswag, replaceswagwith the swag container's name).- If this doesn't work:
- Check if the container is actually running
- Check if both swag and the container in question are on the same container network.
- Try to find the ip of the container on the network shared with swag (e.g.
docker inspect <container name>) and try to ping that from swag (docker exec swag ping <container ip>)- If this succeeds, you have an issue with name resolution inside docker networks
- If this fails, you either have an issue with docker networking in general or the containers don't share a common network.
- If this works:
- Try to fetch the web interface from the swag container:
docker exec swag curl http(s)://<container name>:<application port>(make sure that this matches whatever is in your proxy conf)- If this works: Check your proxy conf again. Probably something (protocol, container name, port) is wrong there
- If this doesn't work:
- Check the startup log of the application (
docker logs <container name>).- Did it start sucessfully/Did it fail for some reason?
- Many applications print what endpoint they are running on there. Check if this matches the values in your proxy conf and the ones used for curl
- Check if the interface the application listens on is correct. Usually this should be 0.0.0.0, but the IP the container has on the network shared with swag should also be fine. If only 127.0.0.1 or another unrelated IP is listed there, this could be the issue.
- Check what protocol and port the application actually listens at. Are your sure you've used the right values?
- Check the startup log of the application (
- Try to fetch the web interface from the swag container:
- If this doesn't work:
Final Thoughts
This image can be used in many different scenarios as it is a full fledged web server with some bells and whistles added. The above examples should be enough to get you started. For more information, please refer to the official documentation on either Github or Docker Hub. If you have questions or issues, or want to discuss and share ideas, feel free to visit our Discord server.
How to Request Support
As you can see in this article, there are many different configurations, therefore we need to understand your exact setup before we can provide support. If you encounter a bug and confirm that it's a bug, please report it on our github thread. If you need help with setting it up, join our discord and upload the following info to a service like pastebin and post the link:
- Docker run/create or compose yml you used
- Full docker log (
docker logs swag) - Any relevant conf files (default, nginx.conf or specific proxy conf)